Lab_13 Irchester is 10 years old!

It’s Lab_13 Irchester’s Birthday! For our 10th Birthday Party, we’re celebrating the FUTURE! We usually have a week of fun science, but this time that’s not long enough so we’re celebrating all next term with a futuristic 3D printer! We’re borrowing one from Create Education for the whole term, which means every single child in the school will be able to design and print their own keyring: year 6 have already started.

We have been finding out about how the lab started, and want to tell you some interesting facts about the lab. The lab’s name came from an art group that was called studio_13, so then we decided to use the 13 but make it about science: so it’s called lab_13! The lab was created in 2011 thanks to a group called Ignite!, who gave the school some money to build the lab, and get a scientist. Rick Hall and Mrs Tyrrell worked very hard to set up the lab, and the first scientist was Miss Hogan, then Miss Draper joined lab_13 in 2015!

Miss Draper has collected some photos from the whole 10 years of the lab, which we have tuned into a giant timeline. It’s really cool to see so much that has happened in the lab over the last 10 years, and now we’re excited to see what happens in the next 10 years. Have a look below to see our timeline!

We also got in touch with a few of the old committee members. It was lovely to hear what they’re doing now: one is planning to become a teacher, and another said he wished he could come and join the committee again. We’d love to hear from any other people who have fond memories of lab_13 Irchester!

By the lab_13 Committee

Marsella, Libby, Zach, Matthew, Kane, Reece, Max and Leon

Posted in Lab13 | Leave a comment

Ways to improve our classrooms: Plants!

Mrs Major asked us (the lab_13 committee) to get some plants for each classroom in the school. This was because she had read that plants can help with air quality in a classroom: by using up the carbon dioxide a whole class breathes out, and producing oxygen. If there is too much carbon dioxide and not enough oxygen we will feel tired, stuffy and it’s hard to learn. Opening the windows is a great start, but having some living plants to look after as well is even better! 

So, the committee got busy! We gathered some plants from the crowded lab windowsill. (thought: maybe the large number of plants is why children learn so well in the lab?) Some pots were crowded with lots of plants, and some plants were just in water. So, we planted each one in it’s own pot, and ended up with over 30 pots of plants like aloe vera, spider plants, jade plants and geraniums. Miss Draper had no idea her plants had multiplied so much, and is very pleased to have a bit more space on the windowsills! 

The next day each committee member chose a plant to bring to their classrooms in year 5 and 6, while the other teachers in the school choose their plants. Now every classroom has a little corner of green, which will hopefully keep the air quality fresh as well as having some living things for the class to look after. We’ll ask the pupils and teachers if they’ve noticed a difference after a few weeks. Some teachers and children have even been bringing in extra plants to add to their classroom gardens! 

By the Lab_13 committee

Posted in Lab13 | Leave a comment

Irchester’s Experiments for the 8-12th June!

I’ll start sending out our experiments a week at a time, so you can choose when to do them!

Monday: Home Experiment: Falling Lemon

Today’s experiment is another magic trick! Can you make a lemon fall into a cup from the top of a tower? Follow these instructions from Science Sparks to find out how! Instead of a lemon you could use an orange, tennis ball orsmall toy: anything that won’t break and is not too light.

Experiment with different objects and different towers: does it work better with lighter or heavier objects? Taller or shorter columns? What else could you change?

Why does the lemon fall into the glass, but the column doesn’t?

Fallig Lemon

Tuesday: What’s Going On: The Big Squeeze!

Today’s activity is all about a rather fruity experiment, with a surprising finish!

Looking at the picture, what do you think might happen in the video?

What’s Going On? The big squeeze from Explorify on Vimeo.

  • How would you describe the watermelon – is it hard or soft, strong or weak?
  • Have you used elastic bands before – what are they useful for?
  • What were the elastic bands doing to the watermelon? How?
  • How many bands do you think it took to split the watermelon?
  • How would you describe what you saw using only one word?

This is a great experiment showing how the force of something tiny like a rubber band, can result in a big effect when you use enough!! Do you think the same thing would happen with an orange or an apple?

Wednesday: Home Experiment: What’s the best paper plane?

Have you ever made a paper plane? Did you know there are lots of different types! How could we compare two types of paper plane, so see which flies the best?

Try making a paper plane: If you want some ideas, check out these instructions from sciencebuddies.org:

paper plane instructions

Find a clear space, and have a go flying your plane – your garden when it’s not windy might be the best place. Make sure there are no people or delicate things in the way, as the planes can be quite sharp! You might need to practice a few times, try holding the plane in different places, and throwing it at different angles until you find something that works.

Once yo’ve mastered one plane, try making a different type! Do you have to change how you hold or throw the second plane? Doesn it fly better or worse than the first plane?

What happens if you make small changes to the angles of the wings, like bending one up slightly and the other down? Can you make a plane that flies to the right or the left?

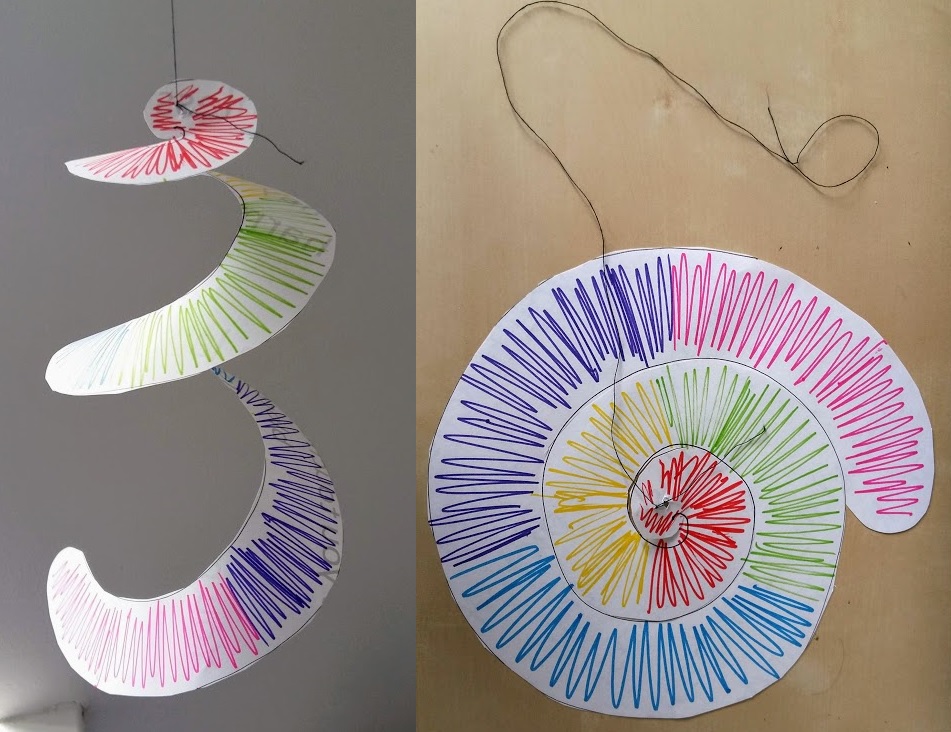
Thursday: Odd One Out: Hanging around

Look at the three pictures, spot as many similarities and differences as possible.

What’s the same between all of them?

What’s different?

OOO hanging around

If you get stuck, think about:

  • What they look like
  • what they are doing
  • where they might be found

Which one do you think is the odd one out? There are no right or wrong answers for this, if you can explain which one you think is the odd one out, well done!

Friday: Big Project: What’s in your Food?

What kind of nutrients are inside our food? If we had a big lab with lots of equipment, we could break down different types of food to find out what is in them for ourselves. However, I doubt any of you have got all the equipment at home, we don’t even have what we would need in lab_13! So the best way to check what is in our food, is to do some research to discover what other scientists have figured out.

With an adult, find a few different types of food from your kitchen. All packaged food should have information printed on the packet, what can you find out about the food?
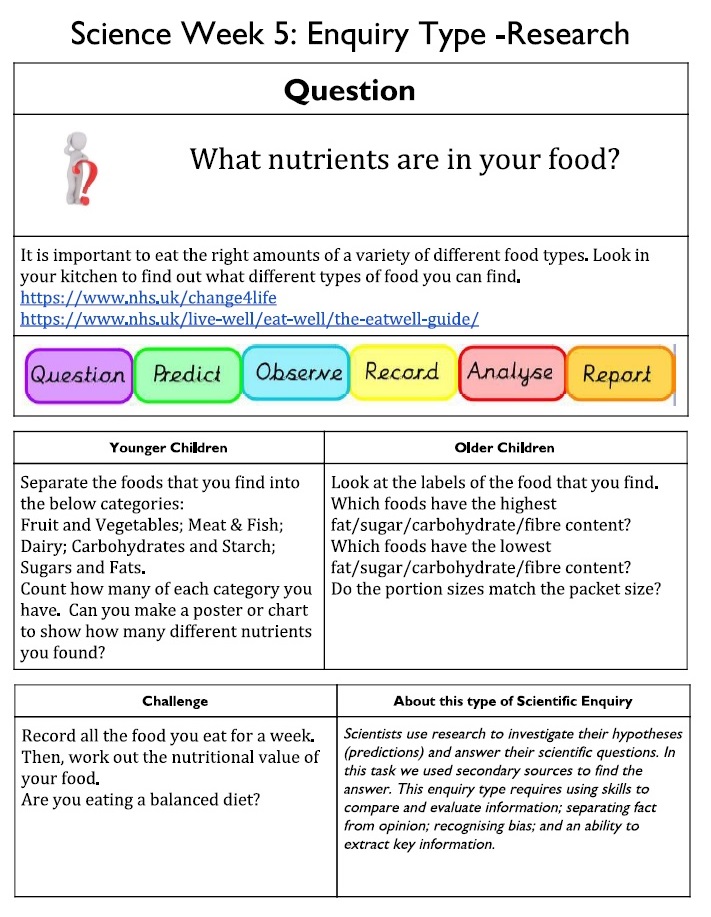
What's in your food

Younger children:

Can you sort the food into different groups: Fruit and Vegetables; Meat & Fish; Dairy; Carbohydrates and Starch; Sugars and Fats. How many things do you have in each group? Have a look at the labels on any packaged food: what kinds of nutrients are in each group?

Older Children:

Look at the labels of the food that you find.

Which foods have the highest fat, sugar, carbohydrate or fibre content?

Which foods have the lowest fat, sugar, carbohydrate or fibre content?

Do the portion sizes match the packet size?

Which food groups have which kinds of nutrients?

Posted in Lab13 | Leave a comment

Friday 22nd May, Lab_13 Birthday: Science Party Cake! What ingredients do we need?

Don’t forget, you can still enter the Science Hat Competition until the Friday after half term!

It’s the lab’s Birthday, but one thing is still missing: Cake! This experiment needs more things and more help from your adult than normal: so you might have to wait and try it out over half term.

Why do we put eggs in cakes? What happens if you make a cake with no butter, oil or margarine? What does the baking powder actually do??

Let’s find out! We will make up to 4 mini cakes, each missing one ingredient. You don’t have make all four cakes, or you could try missing out other ingredients instead.

The lab would love to see how your experimental cakes turn out!

There are two sets of video instructions for the same experiment, but using different equipment:

EITHER From The Royal Institution: Use measuring spoons to measure out the ingredients, and mugs in the microwave to cook your cakes (ideal for younger children).

Cake RI instructions

Make the full recipe once, then try again missing a different ingredient out each time.

OR From the Bristol Science Centre: Use weighing scales to measure out your ingredients, and cupcake cases in an oven to cook your cakes (perfect for older children)

  1. Add 60g margarine to 60g sugar & stir.
  2. Whisk an egg & add this to the mixture.
  3. Add a tablespoon of milk and two drops of vanilla extract. (optional)
  4. Add 1/2 a teaspoon of baking powder to 50g of plain flour & fold into the mixture.
  5. Pour into cake moulds and bake at 180C for 10-12 minutes.

Make the full recipe once, then try again missing a different ingredient out each time.

Posted in Lab13 | Leave a comment

Thursday 21st May, Lab_13 Birthday: Science Party Music!

Let’s make some instruments to play at our birthday party! There are different types of instruments: wind instruments that you blow, stringed instruments where you pluck strings, and percussion instruments that you hit or shake.

Here are some instructions for each kind of instrument: choose one that looks interesting and have a go: We would love to hear any music you create!

Water Xylophone

Use mugs, glasses or jam jars to create a playable xylophone!

water xylophone inst

Rubber Band Guitar

All you need are rubber bands and some clean containers from the recycling bin. These instructions are adapted from Science Sparks and Life at the Zoo, click on the link for more experiments to do with your rubber band guitar.

Rubber band guitar inst

Straw Oboe

This just needs a plastic straw and a pair of scissors, but it takes a bit of practice to make it work! These instructions are adapted from Steve Spangler Science: click on the link for more details and a video.

Straw Oboe inst

Posted in Lab13 | Leave a comment

Wednesday 20th May, Lab_13 Birthday: Science Party Games – in Space?

Have you ever played dizzy dinosaurs? It’s a game to play on the lawn where there is plenty of room:  you spin round and round on the spot until you are dizzy, then try to walk in a straight line! You might even fall over so it’s best to do on soft grass, with nothing nearby you might fall on to.

Dizzy

  1. Find somewhere safe and soft like the middle of the lawn to try it out: check with an adult first.
  2. Spin on the spot for 20 seconds: if you don’t like the feeling then stop early!
  3. Stop spinning, and try to walk in a straight line:
    • what happens?
    • What do you feel?
    • Do you like the feeling?
  4. Don’t worry: everything will go back to normal in a minute or so!

Have you ever wondered why you get dizzy? Your sense of balance comes from a special part of your ear called the Semi Circular Canals, which are tubes with liquid in them. The liquid is pulled downwards by gravity, so when you move it sloshes around a bit, and lets your body know which way is up! But when you spin, the liquid spins as well and carries on spinning even when you stop: which really confuses your sense of balance!

What do you think would happen if you span round and round in the zero gravity of space? Tim Peake tried it on the space station! Make a prediction of what you think will happen, then watch this video:

Or search for “Tim Peake’s Dizziness Experiment” on Youtube Kids.

Did Tim get dizzy in the same way you or I would on Earth?

Why do you think it was different?

In space, there is no gravity to pull the liquid in the Semi Circular Canals downwards. That means most astronauts feel a bit dizzy all the time when they first go to space, but after a few days they get used to it and feel normal again.

Posted in Lab13 | Leave a comment

Tuesday 19th May, Lab_13 Birthday: Science Party Hats – a competition!

Any good party needs party hats, and the lab committee members decided for a lab birthday we need science party hats! Design and make your own hat, inspired by any kind of science! It could be a volcano, dinosaur, nature, space, electricity, organ, light, plant or animal hat, or anything else!

Here are a few hats the committee made to give you inspiration:

Nyah’s beautiful wildflower hat, using leaves and flowers from her garden to decorate a band.Nyah Hat all


Zak’s amazing electric technology hat, with as holder for his phone, built in speaker and a TV to watch!

Zak hat all

Izzy’s great space hat, using paper to create the whole solar system around her head!hat Izzy


As well as having a great new science hat, you can enter a competition! If you want to try and win a prize of 5 science kits, get your parents to go to the competition website by the 5th June: fun-science.org.uk/science-hat-competition and enter a photo of your hat.

The lab committee would love to see your scinece hats as well: comment below or share your creations on Twitter @Lab_13Irchester

Posted in Lab13 | 1 Comment

Monday 18th May, Lab_13 Irchester Birthday: Science Party Decorations!

This week is the lab_13 Irchester Birthday! Our teachers will be sending out extra nature themed plant and animal experiments for Irchester pupils to do around their own house, and the lab experiments shared with you will help create our lab_13 birthday party; there might even be cake!

For today, let’s get started with the decorations. Here is a simple paper twirler that looks good, you can play with it, and do science experiments as well!

twirlers

  1. Draw or print a spiral on a piece of paper: Use this template: Twirler Template or if drawing leave 3-4cm between each loop of the spiral.
  2. Colour and decorate your spiral if you want, then cut carefully along the lines.
  3. Attach a piece of thread or thin string to the middle of the spiral: either with sticky tape or by carefully poking a hole in the paper and tying the string through.

Can you make it spin without touching it?

What happens if you move it through the air or blow on it?

What happens if you hold it above something warm? Try a radiator, a lamp, warm sun on the ground or even someone’s head!

Why do you think this makes it spin?

Posted in Lab13 | Leave a comment

Friday 15th May, Home Experiment: How do shadows change?

This is the next of our Friday Projects, where we are trying out another type of science: when scientists will keep an eye on something to see how it changes over time. Sometimes things change very slowly, like trees growing or rocks forming. Other things change really quickly, like explosions. We will look at something in the middle: shadows! This does need some sunshine, there will hopefully be enough today and over the weekend.

shadows

What to do:

  1. Use sticky-tack or tape to attach something long and thin to your window, like a pencil, ruler or piece of dark tape: try and get its shadow to be on the windowsill or a flat bit of floor.
  2. Place a piece of paper on the windowsill directly underneath the object. It’s important the paper doesn’t move, so you might want to stick it down as well.
  3. Draw round the shadow at different times throughout the day, maybe every hour, or every half hour. If it’s only sunny sometimes, just wait until the sun next comes out!
  4. Label each shadow with when you drew it: you could even colour them in.

Changing Shadows

By the end of the day, look at the shadows that you have drawn. What do you notice?

  • When was the shadow longest? When was it shortest?
  • What direction did it move in?
  • Why do you think the shadow moves?
  • Were you surprised by how quickly the shadow moved?


Bonus experiments:

Is the shadow in the same place at the same time tomorrow, next week, or next month? Why/why not?

Can you make a shadow puppet theatre?

Posted in Lab13 | Leave a comment

Thursday 14th May, Home Experiment: Easy Origami Hovercraft!

This a simple hovercraft that you can make with just a piece of paper! You can follow the picture instructions, or use the video from the Science Fun Website!  

hovercraft pics
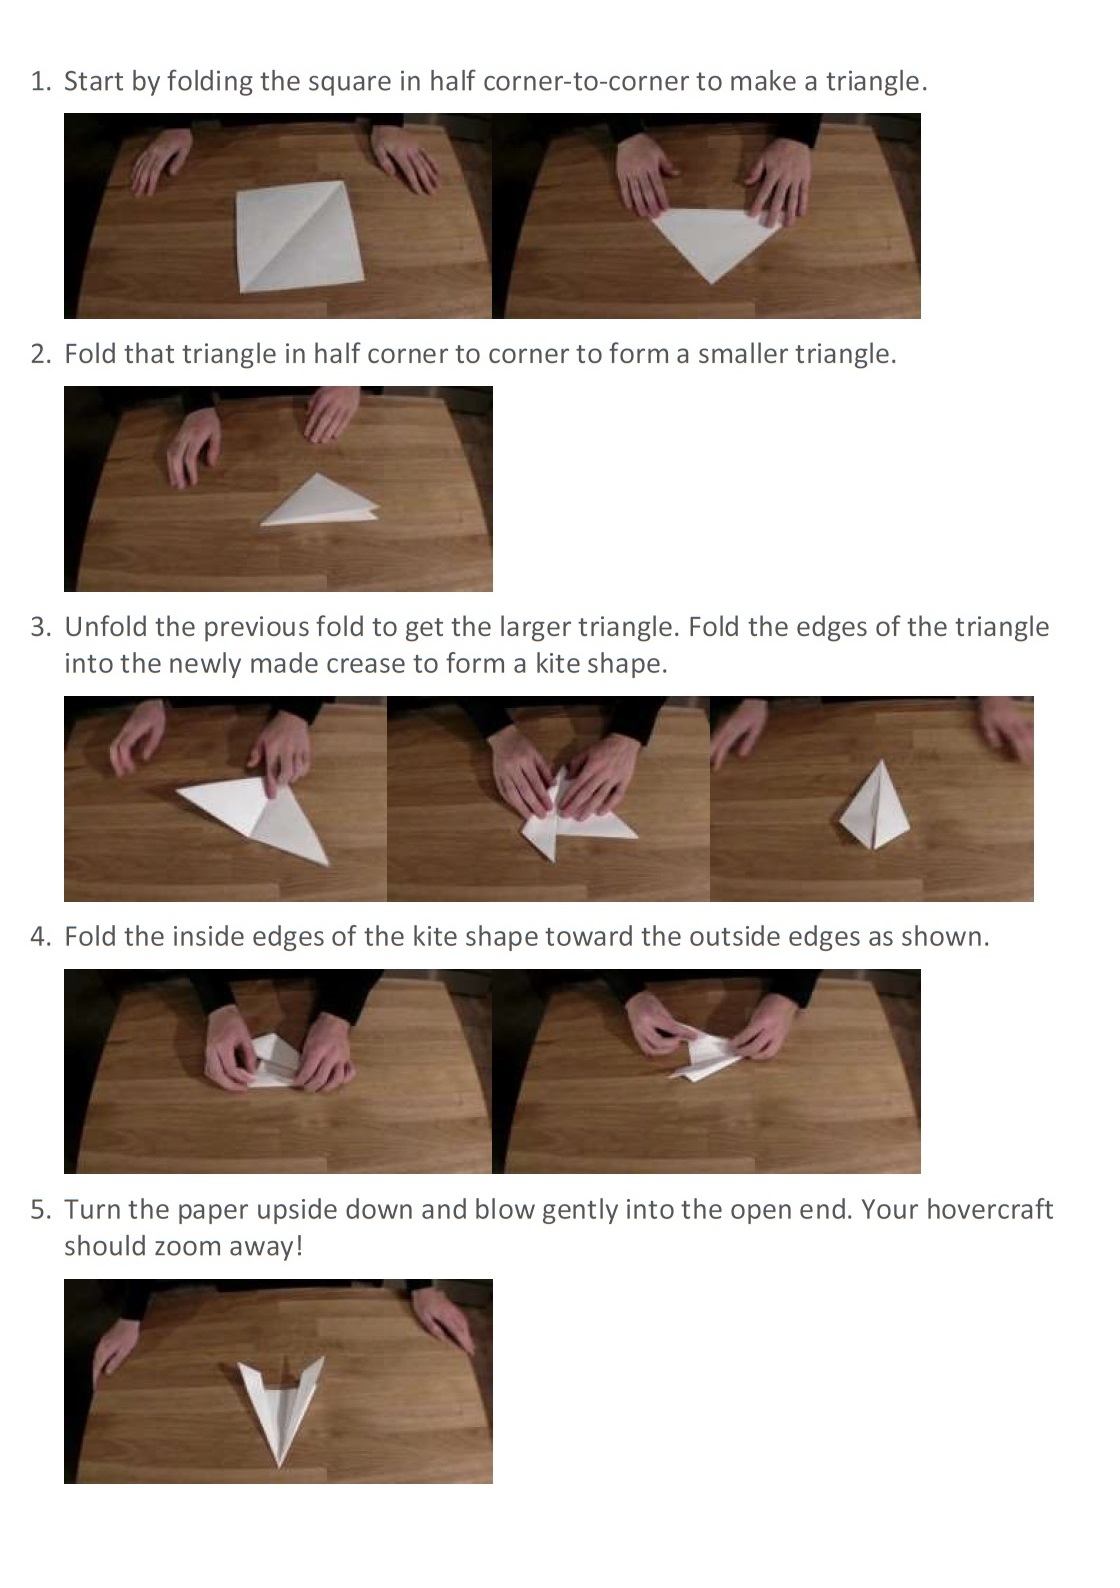
How do you think your hovercraft works?

Does a bigger or smaller hovercraft work better?

Does blowing harder or softer send your hovercraft further?

How far can you send our hovercraft with just one blow?

Posted in Lab13 | Leave a comment